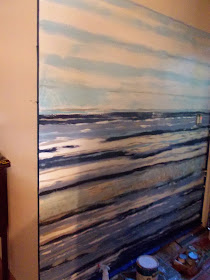
Hi Everyone! By now, if you know me at all, you know what a model home junky I am! Here in Orange County, California, there are always an abundance of new model homes popping up. This is one of my new favorites; Upcoast. In this first of two homes they were showing, I fell in love with this wall mural. At first I thought it was painted, but upon further inspection, realized it is a vinyl wall paper.
You can see the texture when you take an close up look. I was temped to try to hunt down the manufacturer and order it. But my frugal nature told me that I could create my own painted version. It seemed like a fun challenge and if I couldn't pull it off, I could always paint over it!

I went to my local hardware box store and in the paint area, I saw this paint chip right away and decided immediately that these were the colors I needed. Just so you know, that NEVER happens to me when choosing a paint color. I usually have look a EVERY paint chip agonizingly forever first.
This brand is Behr paint. I photo edited the paint chip picture for easier reading. And I purchased one sample size each in satin enamel finish.
I also used some white and medium grey paint that I already had gotten for free from the salvage yard recycling center.
I measured off my wall with straight lines in pencil first as a general guide. The painted lines needed to be soft and abstract and flowing, but they also need to be going in the same straight direction.
A comfy low-sitting chair helps....and cardboard to protect your floor and move when you need it to.
I used this three piece brush set from the 99 cent store. Worked great and you can't beat the price!
First of all I started with the dark navy color and I used the dozen or so photo angles I down loaded onto my computer as a guide while I painted, adding my own touches.
Adding bold strips of colors first, then......
I used a lot of spraying with my water bottle and dabbing with paper towels on the finishing touches.
You can see some of my free salvaged paint I used from the salvage yard recycling center in the picture below, a large can of white satin enamel, absolutely free because someone threw it away. Now it's part of a brand new mural.
The entire process was finished after a few hours.


Found your link at That DIY Party - LOVE your wall. Your painting is better than the model home version! Well done!
ReplyDeleteThank you Zefi!
DeleteHi Mary! This is gorgeous! I love it... you are so brave!
ReplyDeleteWould love to have you share this at our Dishing It & Digging It Link Party! Live every Sunday @ 4pm.
http://www.thestonybrookhouse.com/2016/08/dishing-it-digging-it-link-party-109.html
Thank you so much Lori, I've added my link.
DeleteAmazing. This will be my feature next week on Inspire Me Tuesday.
ReplyDeleteThank you Marty, I'm glad you liked it.
DeleteWow! This is so pretty and unexpected. Thank you for sharing at The Creative Circle!! Pinning. :)
ReplyDeleteHi Kathy, thank you!
DeleteSuch a clever idea for your entry! You did a great job creating your own take on the mural. Visiting from Imparting Grace today.
ReplyDeleteThank you, Mindy!
DeleteIt's beautiful! Kudos to you for tackling such a huge painting!
ReplyDeleteThanks Kim!
DeleteWhat a great job you did!! I love it so much that I will be featuring it this weeks party!! Thanks for sharing on My 2 Favorite Things on Thursday!! Pinned!!
ReplyDeleteThank you so much Elaine!
DeleteThis is amazing and it turned out so well. Great job! :)
ReplyDelete